Guía de Instalación de PSONO Enterprise Edition (EE)
Paso a paso para la instalación de PSONO Enterprise Edition y no morir en el intento.
Previamente estaba realizando varios intentos con la instalación del gestor de contraseñas Psono CE (Community Edition), de dichos intento logré implementarlo en un entorno de pruebas con éxito. A partir de esa experiencia, redacté una guía paso a paso para facilitar el proceso de instalación, especialmente para quienes se enfrentan a esta herramienta por primera vez, ya que en la documentación oficial encontré algunas limitaciones y omisiones que pueden dificultar su implementación.
Con esa base, he preparado esta nueva guía donde detallo los pasos, consideraciones y ajustes necesarios para la implementación de Psono EE (Enterprise Edition), con el objetivo de ayudar a otros usuarios que deseen desplegarla y puedan encontrarse con los mismos desafíos técnicos.
Para estas pruebas, he considerado usar dos equipos con la versión de sistema operativo Ubuntu Desktop 24.04.2:
- 1 para la base de datos con 1 CPU, 1.5GB de memoria RAM y 20GB de disco duro.
- 1 para la aplicación en Docker con 1 CPU, 1GB de memoria RAM y 10GB disco duro.
Importante: Es fundamental tener en cuenta que Psono requiere obligatoriamente dos entornos separados: uno para la base de datos y otro para la aplicación. Esto se debe a que la aplicación debe ejecutarse dentro de un contenedor Docker, y —por alguna razón que he comprobado tras múltiples pruebas— no logra establecer conexión con una base de datos local (localhost). Por lo tanto, si planeas implementar Psono en un solo servidor o equipo, te recomiendo dividir la instalación en dos sistemas distintos:
- uno que aloje la base de datos, y
- otro destinado a la aplicación en Docker.
De lo contrario, la instalación no podrá completarse correctamente.
Instalando PostgreSQL para la Base de Datos
Para la implementación de la base de datos, se utilizó PostgreSQL en su versión 13 tal como es indicado en la guía de instalación, pero puede usarse versiones superiores.
1. Se deberá de abrir un Terminal y ejecutar el siguiente comando:
sudo apt -y install vim bash-completion wget gnupg lsb-release
wget --quiet -O - https://www.postgresql.org/media/keys/ACCC4CF8.asc | sudo apt-key add -
echo "deb http://apt.postgresql.org/pub/repos/apt/ `lsb_release -cs`-pgdg main" | sudo tee /etc/apt/sources.list.d/pgdg.list
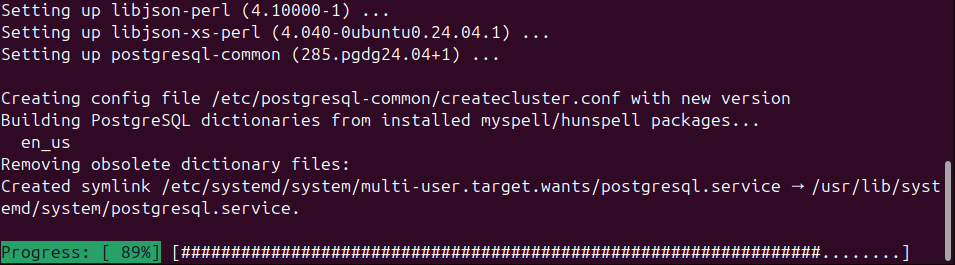
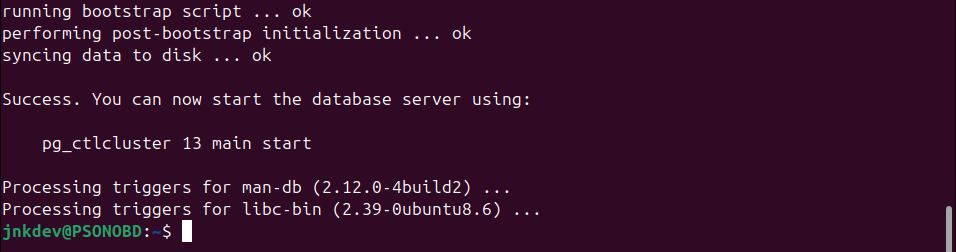
sudo apt -y update
sudo apt -y install postgresql-13 postgresql-client-13Ejemplo:
2. Luego de ejecutar el comando, debemos de cambiar al usuario de postgres:
sudo -iu postgresEjemplo:
3. Crearemos la base de datos llamada "psono":
createdb psono4. Abriremos el simbolo de sistema de postgres para editar la base de datos "psono":
psql psonoEjemplo:
5. Ahora crearemos el usuario para la base de datos "psono" y le daremos privilegios al usuario. Para el ejemplo estoy definiendo el usuario "psono" y la contraseña "password" pero deberan de cambiarlo por una contraseña segura creada por ustedes:
CREATE USER psono WITH PASSWORD 'password';
GRANT ALL PRIVILEGES ON DATABASE "psono" to psono;
GRANT CREATE ON SCHEMA public TO psono;
Ejemplo:
6. Instalaremos algunas extensiones necesarias:
CREATE EXTENSION IF NOT EXISTS ltree;
CREATE EXTENSION IF NOT EXISTS "pgcrypto";
Ejemplo:
7. Salimos de la ventana de shell de postgres y volvemos al usuario normal, para ello:
\q (o Ctrl+D)8. Salimos de postgres completamente y volvemos al usuario de terminal inicial:
exit9. De forma predeterminada, PostgreSQL no permite conexiones externas, por lo que es necesario realizar una configuración en el archivo "pg_hba.conf". En este archivo se debe añadir la dirección IP del host o equipo que accederá a la base de datos, asociándola al usuario. Esta configuración es clave para que la aplicación Psono la cual se ejecutará en otro servidor (vía Docker) pueda conectarse correctamente a la base de datos.
Ejecutamos el siguiente comando:
sudo vim /etc/postgresql/13/main/pg_hba.confNota: En mi caso uso VIM pero puedes usar NANO u otro editor de texto.
Añadiremos al final de archivo las siguientes lineas en donde deberá de cambiar el valor de <IP> por la IP del equipo donde instalará la aplicación de PSONO CE:
host    psono     psono     127.0.0.1/32      md5
host    psono     psono     ::1/128           md5
host    psono     psono     <IP>/32           md5
Ejemplo: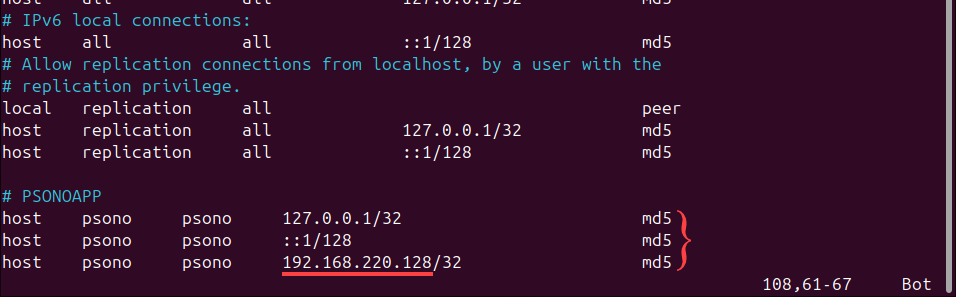
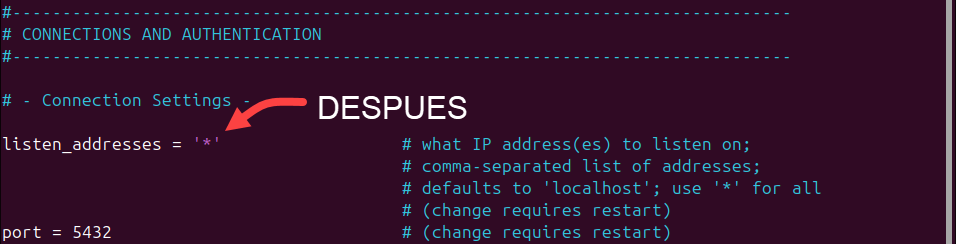
10. Ahora, modificaremos el archivo "postgresql.conf" para permitir las conexiones remotas, para ello ejecutaremos el siguiente comando:
sudo vim /etc/postgresql/13/main/postgresql.confUna vez abierto el archivo, buscaremos la linea "#listen_addresses = 'localhost'", quitaremos el valor comentado (#) y cambiaremos el valor de "localhost" por "*" de la siguiente manera:
Ejemplo: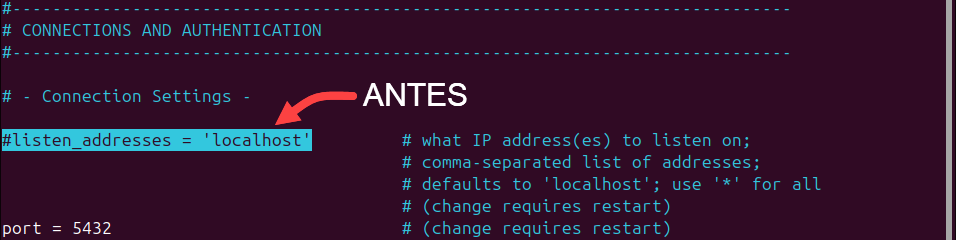
11. Una vez finalizada la configuración, será necesario reiniciar el servicio de base de datos:
sudo systemctl restart postgresql
Instalando la Aplicación PSONO EE
Pre-requisitos:
Antes de la instalación de PSONO, es necesario que el servidor tenga la aplicación de docker instalda, si no la tiene, necesitaremos realizar lo siguiente:
1. Ejecutar el siguiente comando para desinstalar paquetes que puedan generar conflictos con Docker:
for pkg in docker.io docker-doc docker-compose docker-compose-v2 podman-docker containerd runc; do sudo apt-get remove $pkg; done2. Estableciendo el repositorio de Docker con apt:
# Add Docker's official GPG key:
sudo apt-get update
sudo apt-get install ca-certificates curl
sudo install -m 0755 -d /etc/apt/keyrings
sudo curl -fsSL https://download.docker.com/linux/ubuntu/gpg -o /etc/apt/keyrings/docker.asc
sudo chmod a+r /etc/apt/keyrings/docker.asc

# Add the repository to Apt sources:
echo \
  "deb [arch=$(dpkg --print-architecture) signed-by=/etc/apt/keyrings/docker.asc] https://download.docker.com/linux/ubuntu \
  $(. /etc/os-release && echo "${UBUNTU_CODENAME:-$VERSION_CODENAME}") stable" | \
  sudo tee /etc/apt/sources.list.d/docker.list > /dev/null
sudo apt-get update
3. Instalando los paquetes de Docker, para ello ejecutaremos el siguiente comando:
sudo apt-get install docker-ce docker-ce-cli containerd.io docker-buildx-plugin docker-compose-plugin4. (Opcional) Si deseas validar que la instalación se ejecutó correctamente puedes ejecutar el siguiente comando:
sudo docker run hello-world
Instalación:
1. Ya con la aplicación de Docker instalada, como primer paso sera la generación de las llaves, para ello ejecutaremos el siguiente comando:
sudo docker run --rm -ti psono/psono-combo:latest python3 ./psono/manage.py generateserverkeys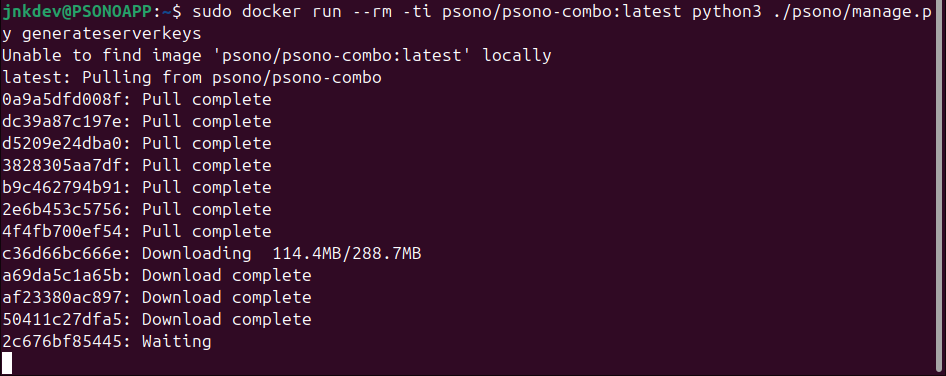
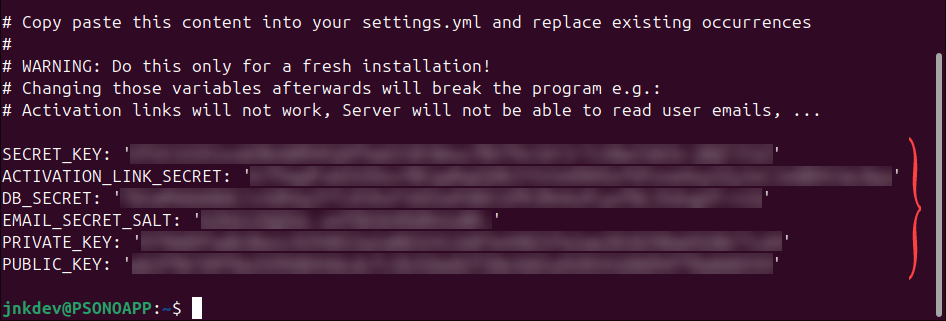
2. Una vez ejecutado el comando, deberemos de tomar nota de los valores generados para SECRET_KEY, ACTIVATION_LINK_SECRET, DB_SECRET, EMAIL_SECRET_SALT, PRIVATE_KEY y PUBLIC_KEY, estos valores seran necesarios para configurar la aplicación.
3. Necesitaremos crear una carpeta donde estará la aplicación y luego necesitaremos crear un archivo dentro de dicha carpeta donde estará el archivo de configuración "settings.yaml", para este caso definiremos la carpeta "/opt/docker/psono":
sudo mkdir /opt/docker
sudo mkdir /opt/docker/psono
sudo vim /opt/docker/psono/settings.yaml
4. En el archivo creado, pegaremos el siguiente contenido reemplazando los valores generdos en el punto 2:
# Replace the keys below with the one from the generateserverkeys command.
SECRET_KEY: 'SOME SUPER SECRET KEY THAT SHOULD BE RANDOM AND 32 OR MORE DIGITS LONG'
ACTIVATION_LINK_SECRET: 'SOME SUPER SECRET ACTIVATION LINK SECRET THAT SHOULD BE RANDOM AND 32 OR MORE DIGITS LONG'
DB_SECRET: 'SOME SUPER SECRET DB SECRET THAT SHOULD BE RANDOM AND 32 OR MORE DIGITS LONG'
EMAIL_SECRET_SALT: '$2b$12$XUG.sKxC2jmkUvWQjg53.e'
PRIVATE_KEY: '02...0b'
PUBLIC_KEY: '02...0b'

# The URL of the web client (path to e.g activate.html without the trailing slash)
WEB_CLIENT_URL: 'https://psono.example.com'

# The number of proxies in your environment to parse the X-Forwarded-For header. The basic setup of Psono uses 2
# reverse proxies, the regular one and one in the combo container. If you have additional Loadbalancers you may have
# adjust this parameter.
NUM_PROXIES: 2

# The URL of the favicon service. You can
# a) host an own favicon server
# b) use a privacy friendly https://favicon.psono.com/v1/icon/
# c) use any other provider, e.g. google's https://t3.gstatic.com/faviconV2?client=SOCIAL&type=FAVICON&fallback_opts=TYPE,SIZE,URL&size=128&url=http://
# WARNING: The "first url filter" (e.g. domain or IP) configured for an entry will be sent to the service.
#
FAVICON_SERVICE_URL: 'https://favicon.psono.com/v1/icon/'

# Switch DEBUG to false if you go into production
DEBUG: False

# Adjust this according to Django Documentation https://docs.djangoproject.com/en/2.2/ref/settings/
ALLOWED_HOSTS: ['*']

# Should be your domain without "www.". Will be the last part of the username
ALLOWED_DOMAINS: ['example.com']

# If you want to disable registration, you can comment in the following line
# ALLOW_REGISTRATION: False

# If you want to disable the lost password functionality, you can comment in the following line
# ALLOW_LOST_PASSWORD: False

# If you want to enforce that the email address and username needs to match upon registration
# ENFORCE_MATCHING_USERNAME_AND_EMAIL: False

# If you want to restrict registration to some email addresses you can specify here a list of domains to filter
# REGISTRATION_EMAIL_FILTER: ['company1.com', 'company2.com']

# Should be the URL of the host under which the host is reachable
# If you open the url and append /info/ to it you should have a text similar to {"info":"{\"version\": \"....}
HOST_URL: 'https://psono.example.com/server'

# The email used to send emails, e.g. for activation
# ATTENTION: If executed in a docker container, then "localhost" will resolve to the docker container, so
# "localhost" will not work as host. Use the public IP or DNS record of the server.
EMAIL_FROM: 'the-mail-for-for-example-useraccount-activations@test.com'
EMAIL_HOST: 'smtp.example.com'
EMAIL_HOST_USER: ''
EMAIL_HOST_PASSWORD : ''
EMAIL_PORT: 25
EMAIL_SUBJECT_PREFIX: ''
EMAIL_USE_TLS: False
EMAIL_USE_SSL: False
EMAIL_SSL_CERTFILE:
EMAIL_SSL_KEYFILE:
EMAIL_TIMEOUT: 10

# If you have your own Yubico servers, you can specify here the urls as a list
# YUBICO_API_URLS: ['https://api.yubico.com/wsapi/2.0/verify']

# Cache enabled without belows Redis may lead to unexpected behaviour

# Cache with Redis
# By default you should use something different than database 0 or 1, e.g. 13 (default max is 16, can be configured in
# redis.conf) possible URLS are:
#    redis://[:password]@localhost:6379/0
#    rediss://[:password]@localhost:6379/0
#    unix://[:password]@/path/to/socket.sock?db=0
# CACHE_ENABLE: False
# CACHE_REDIS: False
# CACHE_REDIS_LOCATION: 'redis://127.0.0.1:6379/13'

# The server will automatically connect to the license server to get a license for 10 users.
# For paying customers we offer the opportunity to get an offline license code.
#
# LICENSE_CODE: |
#   0abcdefg...
#   1abcdefg...
#   2abcdefg...
#   3abcdefg...
#   4abcdefg...
#   5abcdefg...
#   6abcdefg...
#   7abcdefg...
#   8abcdefg...

# Enables the management API, required for the psono-admin-client / admin portal (Default is set to False)
MANAGEMENT_ENABLED: True

# Enables the fileserver API, required for the psono-fileserver
# FILESERVER_HANDLER_ENABLED: False

# Enables files for the client
# FILES_ENABLED: False

# Allows that users can search for partial usernames
# ALLOW_USER_SEARCH_BY_USERNAME_PARTIAL: True

# Allows that users can search for email addresses too
# ALLOW_USER_SEARCH_BY_EMAIL: True

# Disables central security reports
# DISABLE_CENTRAL_SECURITY_REPORTS: True

# Configures a system wide DUO connection for all clients
# DUO_INTEGRATION_KEY: ''
# DUO_SECRET_KEY: ''
# DUO_API_HOSTNAME: ''

# If you are using the DUO proxy, you can configure here the necessary HTTP proxy
# DUO_PROXY_HOST: 'the-ip-or-dns-name-goes-here'
# DUO_PROXY_PORT: 80
# DUO_PROXY_TYPE: 'CONNECT'
# If your proxy requires specific headers you can also configure these here
# DUO_PROXY_HEADERS: ''

# In case one wants to use iVALT, please add ivalt_secret_key. If you don't have then please write to ivat at 'support@ivalt.com'.
# IVALT_SECRET_KEY: ''

# Normally only one of the configured second factors needs to be solved. Setting this to True forces the client to solve all
# MULTIFACTOR_ENABLED: True

# Allows admins to limit the offered second factors in the client
# ALLOWED_SECOND_FACTORS: ['yubikey_otp', 'google_authenticator', 'duo', 'webauthn', 'ivalt']

# If you want to use LDAP, then you can configure it like this
#
#       LDAP_URL: Any valid LDAP string, preferable with ldaps. usual urls are 'ldaps://example.com:636' or 'ldap://192.168.0.1:389'
#       LDAP_DOMAIN: Your LDAP domain, is added at the end of the username to form the full username
#       LDAP_BIND_DN: One User that can be used to search your LDAP
#       LDAP_BIND_PASS: The password of the user specified in LDAP_BIND_DN
#       LDAP_ATTR_GUID: The uuid attribute. e.g. on Windows 'objectGUID', but common are 'GUID' or 'entryUUID', default 'objectGUID'
#       LDAP_OBJECT_CLASS_USER: The objectClass value to filter user objects e.g. on Windows 'user', default 'user'
#       LDAP_OBJECT_CLASS_GROUP: The objectClass value to filter group objects e.g. on Windows 'group', default 'group'
#       LDAP_SEARCH_USER_DN: The "root" from which downwards we search for the users
#       LDAP_SEARCH_GROUP_DN: The "root" from which downwards we search for the groups
#       LDAP_ATTR_USERNAME: The username attribute to try to match against. e.g. on Windows 'sAMAccountName', default 'sAMAccountName'
#       LDAP_ATTR_EMAIL: The attribute of the user objects that holds the mail address e.g. on Windows 'mail', default 'mail'
#       LDAP_ATTR_GROUPS: The attribute of the user objects that holds the groups e.g. on Windows 'memberOf', default 'memberOf'
#       LDAP_REQUIRED_GROUP : The attribute to restrict access / usage. Only members of these groups can connect e.g. ['CN=groupname,OU=something,DC=example,DC=com'], default []
#       LDAP_CA_CERT_FILE: If you want to use ldaps and don't have a publicly trusted and signed certificate you can specify here the path to your ca certificate
#
#       LDAP_MEMBER_OF_OVERLAY: If your server has not this memberOf overlay, you can switch modes with this flag.
#                               Users will be mapped (based on their LDAP_MEMBER_ATTRIBUTE attribute) to groups (based on their LDAP_ATTR_MEMBERS attribute), default True
#       LDAP_MEMBER_ATTRIBUTE: The user attribute that will be used to map the group memberships, default 'uid'
#       LDAP_ATTR_MEMBERS: The group attribute that will be used to map the to the users LDAP_MEMBER_ATTRIBUTE attribute, default 'memberUid'
#
# To help you setup LDAP, we have created a small "testldap" command that should make things a lot easier. You can execute it like:
# docker run --rm \
#  -v /opt/docker/psono/settings.yaml:/root/.psono_server/settings.yaml \
#  -ti psono/psono-combo-enterprise:latest python3 psono/manage.py testldap username@something.com thePassWord
#
# For Windows AD it could look like this:
#
# LDAP : [
#     {
#         'LDAP_URL': 'ldaps://192.168.0.1:636',
#         'LDAP_DOMAIN': 'example.com',
#         'LDAP_BIND_DN': 'CN=LDAPPsono,OU=UsersTech,OU=example.com,DC=example,DC=com',
#         'LDAP_BIND_PASS': 'hopefully_not_123456',
#         'LDAP_SEARCH_USER_DN': 'OU=Users,OU=example.com,DC=example,DC=com',
#         'LDAP_SEARCH_GROUP_DN': 'OU=Groups,OU=example.com,DC=example,DC=com',
#     },
# ]
#
# If your server does not have the memberOf overlay, then you can also do something like this
#
# LDAP : [
#     {
#         'LDAP_URL': 'ldaps://192.168.0.1:636',
#         'LDAP_DOMAIN': 'example.com',
#         'LDAP_BIND_DN': 'CN=LDAPPsono,OU=UsersTech,OU=example.com,DC=example,DC=com',
#         'LDAP_BIND_PASS': 'hopefully_not_123456',
#         'LDAP_SEARCH_USER_DN': 'OU=Users,OU=example.com,DC=example,DC=com',
#         'LDAP_SEARCH_GROUP_DN': 'OU=Groups,OU=example.com,DC=example,DC=com',
#         'LDAP_OBJECT_CLASS_USER': 'posixAccount',
#         'LDAP_OBJECT_CLASS_GROUP': 'posixGroup',
#         'LDAP_ATTR_USERNAME': 'uid',
#         'LDAP_ATTR_GUID': 'entryUUID',
#         'LDAP_MEMBER_OF_OVERLAY': False,
#         'LDAP_MEMBER_ATTRIBUTE': 'uid',
#         'LDAP_ATTR_MEMBERS': 'memberUid',
#     },
# ]
#
# ATTENTION: API kays currently bypass LDAP authentication, that means API keys can still access secrets even if the
# user was disabled in LDAP. API keys can be disabled with COMPLIANCE_DISABLE_API_KEYS

# You also have to comment in the line below if you want to use LDAP (default: ['AUTHKEY'])
# For SAML authentication, you also have to add 'SAML' to the array.
# AUTHENTICATION_METHODS: ['AUTHKEY', 'LDAP']

# Enable Audit logging
# LOGGING_AUDIT: True

# To log to another destination you can specify this here, default '/var/log/psono'
# Never really necessary, as we will run the Psono server in a docker container and can mount /var/log/psono to any
# location on the underlying docker host.
# LOGGING_AUDIT_FOLDER: '/var/log/psono'

# If you prefer server time over utc, you can do that like below (default 'time_utc')
# LOGGING_AUDIT_TIME: 'time_server'

# If the server logs too much for you can either whitelist or blacklist events by their event code. (default: [])
# LOGGING_AUDIT_WHITELIST: []
# LOGGING_AUDIT_BLACKLIST: []

# If you are having Splunk and don't have a Splunk forwarder that can ship the logs, you can use Psono's native Splunk
# implementation to ship the logs for you. In order for that to work you need a Splunk HTTP EVent Collector to be
# configured as explained here https://dev.splunk.com/enterprise/docs/devtools/httpeventcollector/
# Afterwards configure the following variables:
#
# SPLUNK_HOST The host, e.g. an ip or a domain
# SPLUNK_PORT The port, e.g. 8088 that you configured in the splunk http event collector
# SPLUNK_TOKEN The token of your splunk http event collector
# SPLUNK_INDEX The splunk index that you want the events to end up in By default 'main'
# SPLUNK_PROTOCOL 'http' or 'https' to indicate the protocol. By default 'https'
# SPLUNK_VERIFY True or False to indicate whether to verify certificates. By default True
# SPLUNK_SOURCETYPE The source type. By default 'psono:auditLog' (that one is compatible with the provided splunk addons)
#
# More infos can be found here https://github.com/zach-taylor/splunk_handler

# If you have an S3 bucket and want to ship your audit logs to S3, you can use Psono's native S3
# implementation to ship the logs for you:
#
# S3_LOGGING_BUCKET The bucket name
# S3_LOGGING_ACCESS_KEY_ID The access key ID
# S3_LOGGING_SECRET_ACCESS_KEY The secret access key
#

# If you are having Logstash running and no way to ship logs with an external agent, you can use Psono's native Logstash
# implementation to ship the logs for you:
#
# LOGSTASH_HANDLER Shipping logs either async (logstash_async.handler.AsynchronousLogstashHandler) or in sync (logstash_async.handler.SynchronousLogstashHandler). By default 'logstash_async.handler.SynchronousLogstashHandler'
# LOGSTASH_TRANSPORT The transport to use. TCP: logstash_async.transport.TcpTransport or UDP: logstash_async.transport.UdpTransport or Beats logstash_async.transport.BeatsTransport or HTTP logstash_async.transport.HttpTransport. Defaults to 'logstash_async.transport.TcpTransport'
# LOGSTASH_HOST The host, e.g. an ip or a domain
# LOGSTASH_PORT The port, e.g. 5959 that you configured the. By default 5959
# LOGSTASH_SSL_ENABLED Wether you want to use SSL or not. By default True
# LOGSTASH_SSL_VERIFY True or False whether to verify certificates. By default True
# LOGSTASH_CA_CERTS If you want a custom CA, you can specify here a path to the file with the certs
# LOGSTASH_CERFILE The path to the cert file
# LOGSTASH_KEYFILE The path to the key file
#
# More infos can be found here https://python-logstash-async.readthedocs.io/en/stable/index.html

# If you want to use SAML, then you can configure it like this as a dictionary.
#
# About the parameters:
#   idp->entityId: Thats the url to the metadata of your IDP
#   idp->singleLogoutService->url: Thats the url to the logout service of your IDP
#   idp->singleSignOnService->url: Thats the url to the single sign-on service of your IDP
#   idp->x509cert: Thats the certificate of your IDP
#   idp->groups_attribute: The attribute in the SAML response that holds your groups
#   idp->username_attribute: The attribute in the SAML response that holds the username. If you put here null, then it will use the NameID
#   idp->email_attribute: The attribute in the SAML response that holds the email address.
#   idp->username_domain: The domain that is appended to the provided username, if the provided username is not already in email format.
#   idp->required_group: A list of group names (casesensitive) in order to restrict who can use SAML login with this installation. Leave empty for no restriction.
#   idp->is_adfs: If you are using ADFS.
#   idp->honor_multifactors: Multifactor authentication can be bypassed with this flag for all SAML users (e.g. when you already enforce multifactor on the SAML provider).
#   idp->max_session_lifetime: The time in seconds that a session created throught SAML will live
#
#   sp->NameIDFormat: The normal nameformat parameter. (should only be set to transient if you have set a username attribute with username_attribute)
#   sp->attributeConsumingService: Only necessary if the IDP needs to be told to send some specific attributes
#   sp->x509cert: The X.509 cert
#   sp->privateKey: The corresponding private key of the X.509 cert
#
# There are a couple of more options next to those required ones below.
# More information can be found here https://github.com/onelogin/python3-saml
#
# A self-signed certificate can be generated with:
# openssl req -new -newkey rsa:2048 -x509 -days 3650 -nodes -sha256 -out sp_x509cert.crt -keyout sp_private_key.key
#
# To help you setup SAML, we have created a small "testsaml" command that should make things easier. You can execute it like:
# docker run --rm \
#  -v /opt/docker/psono/settings.yaml:/root/.psono_server/settings.yaml \
#  -ti psono/psono-combo-enterprise:latest python3 psono/manage.py testsaml
#
# The number 1 in line 2 is the provider id. Users are matched by the constructed username.
#
# SAML_CONFIGURATIONS:
#     1:
#         idp:
#             entityId: "https://idp.exampple.com/metadata.php"
#             singleLogoutService:
#                 binding: "urn:oasis:names:tc:SAML:2.0:bindings:HTTP-Redirect"
#                 url: "https://idp.exampple.com/SingleLogoutService.php"
#             singleSignOnService:
#                 binding: "urn:oasis:names:tc:SAML:2.0:bindings:HTTP-Redirect"
#                 url: "https://idp.exampple.com/SingleSignOnService.php"
#             x509cert: "ABC...=="
#             groups_attribute: "groups"
#             username_attribute: 'username'
#             email_attribute: 'email'
#             username_domain: 'example.com'
#             required_group: []
#             is_adfs: false
#             honor_multifactors: true
#             max_session_lifetime: 86400
#         sp:
#             NameIDFormat: "urn:oasis:names:tc:SAML:2.0:nameid-format:persistent"
#             assertionConsumerService:
#                 binding: "urn:oasis:names:tc:SAML:2.0:bindings:HTTP-POST"
#             attributeConsumingService:
#                 serviceName: "Psono"
#                 serviceDescription: "Psono password manager"
#                 requestedAttributes:
#                     -
#                         attributeValue: []
#                         friendlyName: ""
#                         isRequired: false
#                         name: "attribute-that-has-to-be-requested-explicitely"
#                         nameFormat: ""
#             privateKey: "ABC...=="
#             singleLogoutService:
#                 binding: "urn:oasis:names:tc:SAML:2.0:bindings:HTTP-Redirect"
#             x509cert: "ABC...=="
#             autoprovision_psono_folder: false
#             autoprovision_psono_group: false
#         strict: true
#
# You need a couple of urls to configure the IDP correctly. If the server is accessible under https://example.com/server
# (e.g. https://example.com/server/healthcheck/ shows some json output) and the provider id is 1 as in the example
# above the following urls are valid:
#
# for metadata :                   https://example.com/server/saml/1/metadata/
# for assertion consumer service : https://example.com/server/saml/1/acs/
# for single logout service :      https://example.com/server/saml/1/sls/
#
#
# ATTENTION: API kays currently bypass SAML authentication, that means API keys can still access secrets even if the
# user was disabled in SAML. API keys can be disabled with COMPLIANCE_DISABLE_API_KEYS

# If you want to use OIDC, then you can configure it like this as a dictionary.
# OIDC_CONFIGURATIONS:
#     1:
#         OIDC_RP_SIGN_ALGO: 'RS256'
#         OIDC_RP_CLIENT_ID: 'whatever client id was provided'
#         OIDC_RP_CLIENT_SECRET: 'whatever secret was provided'
#         OIDC_OP_JWKS_ENDPOINT: 'https://example.com/jwks'
#         OIDC_OP_AUTHORIZATION_ENDPOINT: 'https://example.com/authorize'
#         OIDC_OP_TOKEN_ENDPOINT: 'https://example.com/token'
#         OIDC_OP_USER_ENDPOINT: 'https://example.com/userinfo'
#
# Standard parameters explained:
# OIDC_RP_SIGN_ALGO defaults to HS256 and needs to match the algo of your IDP
# OIDC_RP_CLIENT_ID the client id that is provided by your IDP
# OIDC_RP_CLIENT_SECRET the secret that is provided by your IDP
# OIDC_OP_JWKS_ENDPOINT The JWKS endpoint of your IDP
# OIDC_OP_AUTHORIZATION_ENDPOINT The authorization endpoint of your IDP
# OIDC_OP_TOKEN_ENDPOINT The token endpoint of your IDP
#
# other parameters are:
# OIDC_VERIFY_JWT defaults to true, Controls whether Psono verifies the signature of the JWT tokens
# OIDC_USE_NONCE defaults to true, Controls whether Psono uses nonce verification
# OIDC_VERIFY_SSL defaults to true, Controls whether Psono verifies the SSL certificate of the IDP responses
# OIDC_TIMEOUT defaults to 10, Defines a timeout for all requests in seconds to the IDP (fetch JWS, retrieve JWT tokens, userinfo endpoint))
# OIDC_PROXY defaults to None, Defines a proxy for all requests to the IDP (fetch JWS, retrieve JWT tokens, Userinfo Endpoint). More infos can be found here https://requests.readthedocs.io/en/master/user/advanced/#proxies
# OIDC_RP_SCOPES defaults to 'openid email', The OpenID Connect scopes to request during login.
# OIDC_AUTH_REQUEST_EXTRA_PARAMS defaults to {}, Additional parameters to include in the initial authorization request.
# OIDC_RP_IDP_SIGN_KEY defaults to None, Sets the key the IDP uses to sign ID tokens in the case of an RSA sign algorithm. Should be the signing key in PEM or DER format.
# OIDC_ALLOW_UNSECURED_JWT defaults to False, Controls whether the Psono is going to allow unsecured JWT tokens (tokens with header {"alg":"none"}). This needs to be set to True if the IDP is returning unsecured JWT tokens and you want to accept them. See also https://tools.ietf.org/html/rfc7519#section-6
# OIDC_TOKEN_USE_BASIC_AUTH defaults to False, Use HTTP Basic Authentication instead of sending the client secret in token request POST body.

# Your Postgres Database credentials
# ATTENTION: If executed in a docker container, then "localhost" will resolve to the docker container, so
# "localhost" will not work as host. Use the public IP or DNS record of the server.
DATABASES:
    default:
        'ENGINE': 'django.db.backends.postgresql_psycopg2'
        'NAME': 'psono'
        'USER': 'psono'
        'PASSWORD': 'password'
        'HOST': 'localhost'
        'PORT': '5432'
# for master / slave replication setup comment in the following (all reads will be redirected to the slave
#    slave:
#        'ENGINE': 'django.db.backends.postgresql_psycopg2'
#        'NAME': 'YourPostgresDatabase'
#        'USER': 'YourPostgresUser'
#        'PASSWORD': 'YourPostgresPassword'
#        'HOST': 'YourPostgresHost'
#        'PORT': 'YourPostgresPort'

# The path to the template folder can be "shadowed" if required later
TEMPLATES: [
    {
        'BACKEND': 'django.template.backends.django.DjangoTemplates',
        'DIRS': ['/root/psono/templates'],
        'APP_DIRS': True,
        'OPTIONS': {
            'context_processors': [
                'django.template.context_processors.debug',
                'django.template.context_processors.request',
                'django.contrib.auth.context_processors.auth',
                'django.contrib.messages.context_processors.messages',
            ],
        },
    },
]
Luego deberemos de modifcar el contenido del archivo de configuración considerando lo siguiente:
a. Debemos de reemplazar las primera 6 lineas con las llaves generadas en el punto 2.
b. WEB_CLIENT_URL: Indica la URL que se usará el cliente web.
c. HOST_URL: Para indicar la URL que se usará para acceder a la aplicación mediante el cliente web. Es importante mantener el sufijo "/server" al final de la URL.
d. ALLOWES_DOMAINS: Para establecer tu dominio. Debemos de indicar si la URL. Puede ser un dominio interno o el dominio público externo en caso de que la aplicación sea accesible desde Internet.
e. Los parametros de Email pueden configurarse tanto en el archivo de configuración como dentro de la aplicación y dependerá del servicio de Email que tengas contratado o implementado de manera local.
f. LOGGING_AUDIT: Para habilitar el registro de auditoría.
g. LOGGING_AUDIT_FOLDER: Para especificar otro destino donde se creará el archivo "audit.log"; el valor predeterminado es '/var/log/psono'. No es realmente necesario, ya que ejecutaremos el servidor Psono en un contenedor Docker y podremos montar /var/log/psono en cualquier ubicación del host Docker subyacente.
h. LOGGING_AUDIT_TIME: En caso se prefiera la hora del servidor en lugar de UTC, puedes hacerlo como se muestra a continuación (valor predeterminado: 'time_utc').
i. Para la Base de Datos, debemos de colocar los valores configurados en la primera parte de la guia indicando el nombre de la base de datos, usuario, contraseña, IP del servidor y el puerto.
Ejemplo:
A continuación les comparto un ejemplo del archivo de configuración del ambiente de pruebas que implementé:


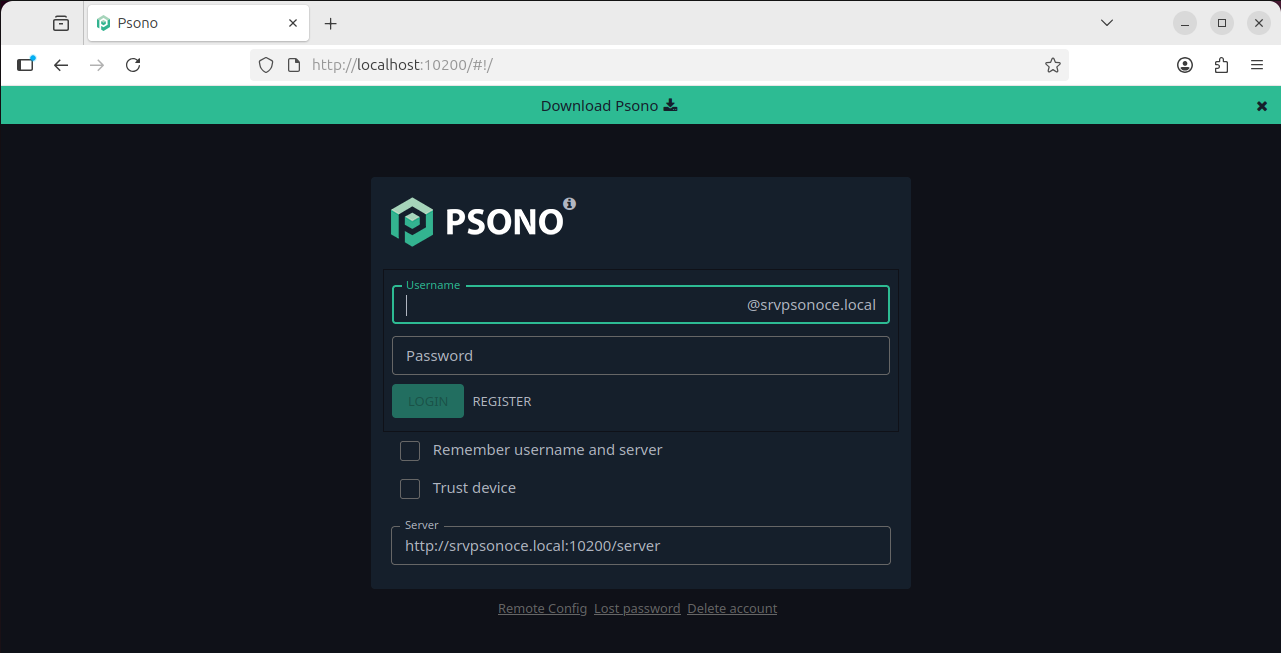
En mi caso y como lo estoy implementando en un entorno local para las pruebas, estoy usando el nombre de dominio "srvpsonoce.local" que luego y para una mayor comodidad de acceso se puede modifcar el archivo host de la estación de la red local para acceder o si se encuentra en dominio, se podria crear un registro en el DNS del AD y asociarlo a la IP.
4. Antes de realizar la instalación de la aplicación, tendremos que crear un directorio para los logs de auditoria:
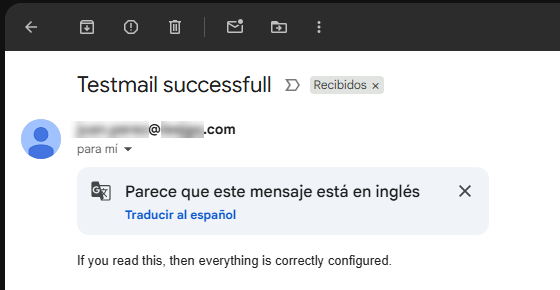
sudo mkdir -p /var/log/psono5. (Opcional) ara verificar que los parámetros de correo configurados sean correctos, es posible ejecutar el siguiente comando de prueba de envío hacia una dirección de correo, por ejemplo: something@something.com. Este paso permite confirmar que el servidor de correo y las credenciales configuradas funcionan adecuadamente antes de integrarlo con Psono.
sudo docker run --rm \
  -v /opt/docker/psono/settings.yaml:/root/.psono_server/settings.yaml \
  -ti psono/psono-combo-enterprise:latest python3 ./psono/manage.py sendtestmail something@something.com
Ejemplo:
6. Preparando la base de datos, para ello debemos de ejecutar el siguiente comando:
sudo docker run --rm \
  -v /opt/docker/psono/settings.yaml:/root/.psono_server/settings.yaml \
  -ti psono/psono-combo-enterprise:latest python3 ./psono/manage.py migrate
Ejemplo: 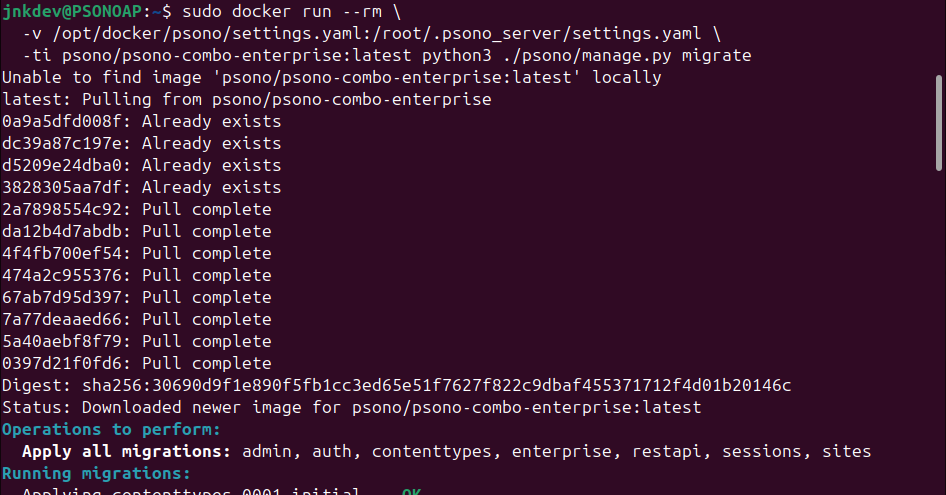

7. Debemos de crear una carpeta que contendrá el archivo de configuración del cliente, para ello ejecutaremos el siguiente comando, considerando que estoy definiendo que la ruta donde estará el archivo de configuración será "/opt/docker/psono-client/":
sudo mkdir /opt/docker/psono-client/
sudo vim /opt/docker/psono-client/config.json
8. Ahora, debemos de pegar las siguientes lineas en el nuevo archivo creado:
{
  "backend_servers": [{
    "title": "Psono.pw",
    "url": "https://psono.example.com/server"
  }],
  "base_url": "https://psono.example.com/",
  "allow_custom_server": true,
  "allow_registration": true,
  "allow_lost_password": true,
  "disable_download_bar": false,
  "authentication_methods": ["AUTHKEY", "LDAP"],
  "saml_provider": []
}
Luego deberemos de modifcar el contenido del archivo de configuración considerando lo siguiente:
a. title: el texto que se mostrará al acceder al sitio web de Psono.
b. url: la misma que HOST_URL que configuramos en settings.yaml.
c. base_url: la misma que url, pero sin el /server.
Ejemplo:
A continuación les comparto un ejemplo del archivo de configuración del ambiente de pruebas que implementé: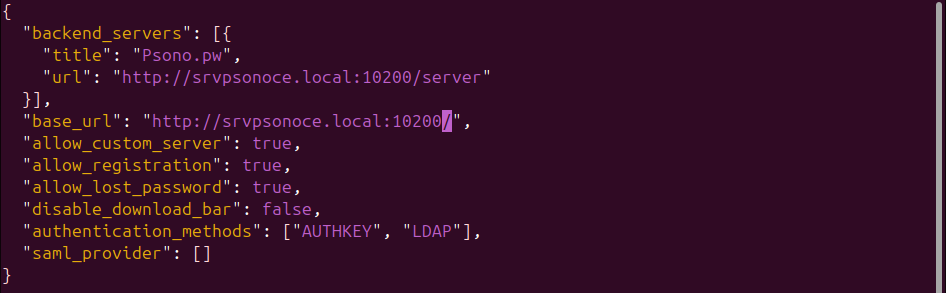
8. Seguidamente, debemos de ejecutar el siguiente comando para que la aplicación de Psono CE inicie en el contenedor de Docker:
sudo docker run --name psono-combo-enterprise \
    --sysctl net.core.somaxconn=65535 \
    -v /opt/docker/psono/settings.yaml:/root/.psono_server/settings.yaml \
    -v /opt/docker/psono-client/config.json:/usr/share/nginx/html/config.json \
    -v /opt/docker/psono-client/config.json:/usr/share/nginx/html/portal/config.json \
    -v /var/log/psono:/var/log/psono \
    -d --restart=unless-stopped -p 10200:80 psono/psono-combo-enterprise:latest
Ejemplo: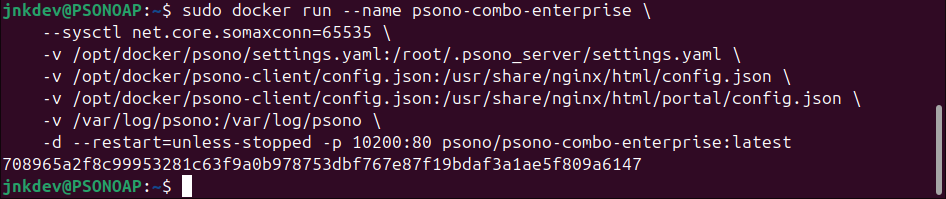
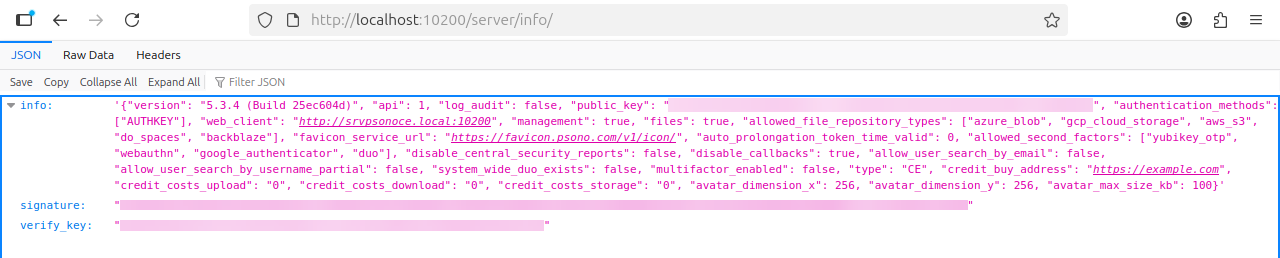
Esto iniciará el servidor Psono en el puerto 10200. Si abres ahora http://<IP>:10200/server/info/ deberías ver algo como esto:
9. Por último, debemos de crear la tarea de mantenimiento, para ello será necesario configurarlo con un cron ejecutando los siguientes comandos:
crontab -eY luego colocaremos la siguiente linea:
30 2 * * * /usr/bin/docker run --rm -v /opt/docker/psono/settings.yaml:/root/.psono_server/settings.yaml psono/psono-combo-enterprise:latest python3 ./psono/manage.py cleartoken >> /var/log/cron.log 2>&1
10. Si todo lo hemos ejecutado correctamente, deberia de cargarnos la aplicación desde un navegador de la siguiente manera:
Implementando el Proxy Reverso (Reverse Proxy)
Ahora, como puedes apreciar, la aplicación Psono está ejecutándose en el puerto 80, el cual es un puerto inseguro y no recomendado para entornos productivos. En la documentación de Psono nos menciona como tercer paso la implentación de un Proxy Reverso el cual se encargaria de administrar el trafico hacia la aplicación Psono mediante un certificado SSL.
Siguiendo la documentación de Psono, utilizaremos la aplicación Nginx que configuraremos de la siguiente manera:
Importante:
En nuestro ejemplo, utilizaremos un certificado auto-firmado, pero tambien puedes usar un certificado publico.
Creando el certificado auto-firmado:
1. Necesitaremos crear una carpeta donde estará el certificado y su llave privada, para este caso definiremos la carpeta "/etc/ssl/psono":
sudo mkdir -p /etc/ssl/psono
cd /etc/ssl/psono
2. Luego, crearemos el certificado, para ello ejecutaremos el siguiente comando:
sudo openssl req -new -newkey rsa:4096 -x509 -days 1825 -nodes -sha256 \
-out srvpsonoee.local_cert.crt \
-keyout srvpsonoee.local_private_key.key
Instalando Nginx:
1. Para instalar Nginx, tendremos que ejecutar el siguiente comando:
sudo apt-get install nginx2. Creando el archivo de configuración de nginx, para ello ejecutaremos lo siguiente:
sudo vim /etc/nginx/sites-available/psono.conf3. En el archivo creado, pegaremos el siguiente contenido:
server {
    listen 80;
    server_name psono.example.com;
    return 301 https://$host$request_uri;
}

server {
    listen 443 ssl http2;
    server_name psono.example.com;

    ssl_protocols TLSv1.2 TLSv1.3;
    ssl_prefer_server_ciphers on;
    ssl_session_cache shared:SSL:10m;
    ssl_session_tickets off;
    ssl_stapling on;
    ssl_stapling_verify on;
    ssl_session_timeout 1d;
    resolver 8.8.8.8 8.8.4.4 valid=300s;
    resolver_timeout 5s;
    ssl_ciphers 'ECDHE-ECDSA-AES256-GCM-SHA384:ECDHE-RSA-AES256-GCM-SHA384:ECDHE-ECDSA-CHACHA20-POLY1305:ECDHE-RSA-CHACHA20-POLY1305:ECDHE-ECDSA-AES128-GCM-SHA256:ECDHE-RSA-AES128-GCM-SHA256:ECDHE-ECDSA-AES256-SHA384:ECDHE-RSA-AES256-SHA384:ECDHE-ECDSA-AES128-SHA256:ECDHE-RSA-AES128-SHA256';

    # Comment this in if you know what you are doing
    # add_header Strict-Transport-Security "max-age=63072000; includeSubdomains; preload";

    add_header Referrer-Policy same-origin;
    add_header X-Frame-Options DENY;
    add_header X-Content-Type-Options nosniff;
    add_header X-XSS-Protection "1; mode=block";

    # If you have the fileserver too, then you have to add your fileserver URL e.g. https://fs01.example.com as connect-src too:
    add_header Content-Security-Policy "default-src 'none';  manifest-src 'self'; connect-src 'self' https://static.psono.com https://api.pwnedpasswords.com https://storage.googleapis.com https://*.digitaloceanspaces.com https://*.blob.core.windows.net https://*.s3.amazonaws.com; font-src 'self'; img-src 'self' https://favicon.psono.com data:; script-src 'self'; style-src 'self' 'unsafe-inline'; object-src 'self'; child-src 'self'";

    ssl_certificate /etc/ssl/fullchain.pem;
    ssl_certificate_key /etc/ssl/privkey.pem;

    client_max_body_size 256m;

    gzip on;
    gzip_disable "msie6";

    gzip_vary on;
    gzip_proxied any;
    gzip_comp_level 6;
    gzip_buffers 16 8k;
    gzip_http_version 1.1;
    gzip_min_length 256;
    gzip_types text/plain text/css application/json application/x-javascript application/javascript text/xml application/xml application/xml+rss text/javascript application/vnd.ms-fontobject application/x-font-ttf font/opentype image/svg+xml image/x-icon;

    root /var/www/html;

    location ~* \.(?:ico|css|js|gif|jpe?g|png|eot|woff|woff2|ttf|svg|otf)$ {
        expires 30d;
        add_header Pragma public;
        add_header Cache-Control "public";

        proxy_set_header        Host $host;
        proxy_set_header        X-Real-IP $remote_addr;
        proxy_set_header        X-Forwarded-For $proxy_add_x_forwarded_for;
        proxy_set_header        X-Forwarded-Proto $scheme;
        proxy_hide_header Content-Security-Policy;

        proxy_pass          http://localhost:10200;
        proxy_redirect      http://localhost:10200 https://psono.example.com;
    }

    location / {
        proxy_set_header        Host $host;
        proxy_set_header        X-Real-IP $remote_addr;
        proxy_set_header        X-Forwarded-For $proxy_add_x_forwarded_for;
        proxy_set_header        X-Forwarded-Proto $scheme;
        proxy_hide_header Content-Security-Policy;

        proxy_pass          http://localhost:10200;
        proxy_read_timeout  90;

        proxy_redirect      http://localhost:10200 https://psono.example.com;
    }
}
4. Habilitar la configuración de nginx:
sudo ln -s /etc/nginx/sites-available/psono.conf /etc/nginx/sites-enabled/5. Ahora es momento de probar la configuración, para ello se ejecutará el siguiente comando:
sudo nginx -t6. Reiniciando el servicio de Nginx:
sudo service nginx restart
Creando el Primer Usuario Administrador
Luego de configurar Psono EE, puede crear su primer usuario. Si configuró el correo, se puede usar el procedimiento de registro habitual el cual consiste en registrarse desde la web haciendo clic en el boton de "Register". De lo contrario, puede usar el siguiente comando para crear un usuario desde la línea de comandos:
1. Para crear el usuario desde linea de comando se deberá de ejecutar lo siguiente:
sudo docker run --rm \
  -v /opt/docker/psono/settings.yaml:/root/.psono_server/settings.yaml \
  -ti psono/psono-combo-enterprise:latest python3 ./psono/manage.py createuser username@example.com myPassword email@something.com
Ejemplo:
2. Ahora, con el usuario creado, podremos otorgarle permisos de Administración, para ello debemos de ejecutar el siguiente comando:
sudo docker run --rm \
  -v /opt/docker/psono/settings.yaml:/root/.psono_server/settings.yaml \
  -ti psono/psono-combo-enterprise:latest python3 ./psono/manage.py promoteuser username@example.com superuser
Ejemplo:
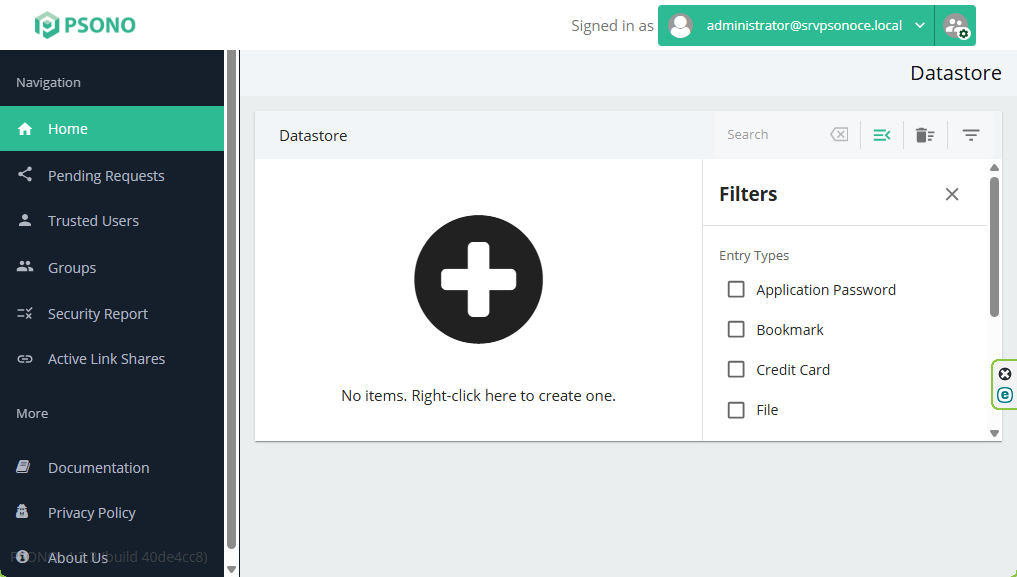
3. Con la cuenta de usuario creada podremos probar ingresando al portal de Psono EE.
Referencias:
https://doc.psono.com/admin/installation/install-preparation.html#system-requirements
https://doc.psono.com/admin/installation/install-postgres-db.html#preamble
https://doc.psono.com/admin/installation/install-psono-ee.html#installation
https://doc.psono.com/admin/installation/install-finalize.html#preamble
https://doc.psono.com/admin/configuration/audit-log.html#preamble
https://docs.docker.com/engine/install/ubuntu/


